Customize Touchpad Gestures & Clean Up Storage after Upgrading in Windows 11
Over the years, the touchpad on PCs has been created from being just a mouse substitution to performing more activities. In October 2021, Windows 11 was sent off, and nearly everybody has been involved in it throughout recent months. One this that makes Windows 11 additional easy to use for PC clients is touchpad signals. If you have a Windows 11 PC, you can modify it to do the exact thing you need. Today in this article, we will enlighten you on tweaking touchpad signals in Windows 11. In addition, we have made a simple aide for you through which you will want to set alerts for your Windows 11 PCs in a couple of fundamental advances. Along these lines, we should get everything rolling with no further ado.
How to Customize Touchpad Gestures in Windows 11?
You should go through all the beneath referenced strides to redo touchpad motions on your Windows 11 PC. That is the way to redo touchpad motions in Windows 11:
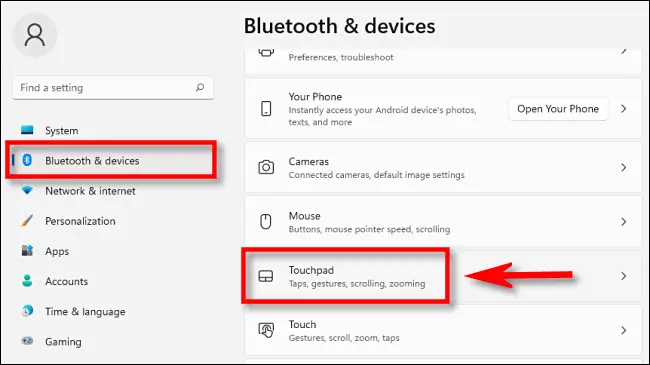
Stage 1. Open Settings on your PCs by going to the Start Menu and tapping on the Settings symbol afterwards, or you can press Win+I to open the settings straightforwardly. Presently on the left sheet, click on the Bluetooth and gadgets choice.
Stage 2. Presently look down and snap on the Touchpad choice to redo signals.
Stage 3. Under Gestures and Interaction, you will observe two choices three-finger signals and four-finger motions. Whenever you tap on any of these two choices, it will show you everything you can access through calls.
NOTE: You might change those signals to different activities like switch applications and show work area, switch areas and show work area, or change sound and volume.
Stage 4. Look down and snap on the Advance Gestures choice to customize those signals. Presently you can tweak three and four-finger motions to activities like taps and individual swipes. You are good to go whenever you have picked the most choice you utilize.
Stage 5. After you have finished every one of the means, you will want to utilize your redid motions with no issues.
Also Read: Samsung Galaxy M53 Camera Performance
How to Reset Touchpad Gestures in Windows 11?
Making excessive customization can become confounding, yet you can generally reset them to begin without any preparation. For example, that is the way to reset touchpad motions in Windows 11:
Stage 1. Open Settings and afterwards head to Bluetooth and Devices. Presently look down and snap on the Touchpad choice.
Stage 2. After that, snap on the first touchpad choice to grow. Then, click on the Reset button close to Reset touchpad settings and signals to default, and that is all there is to it. Presently all your touchpad motion changes will want, and you will want to utilize the touchpad signals like previously.
Conclusion
By following all the previously mentioned advances, you will want to modify your touchpad motions in Windows 11. Using this customization technique, you can set up your touchpad motions to make them more practical and increase your efficiency. We have additionally added a part through which you can reset every one of the signals if it gets somewhat irritating or you need to utilize stock settings once more. Along these lines, evaluate this customization signal component on your Windows 11 PCs and work more efficiently.
How to Clean Up Storage after Upgrading to Windows 11
It’s been a long time since Windows 11 was sent off, and nearly everybody has updated from Windows 10. On the off chance that you have as of late moved up to Windows 11, you could have seen out of the nowhere extra room has been taken up. This article will advise tidying up stockpiling after moving up to Windows 11. It will help if you let open space on the plate to utilize the most recent Windows 11 with no issue.
Windows 11 accompanies an element that permits you to tidy up circle space; however, it is somewhat irritating to track down it. We will share two strategies through which you can tidy up your plate space without any problem. We are likewise going to explain to you the justification for why circle space gets topped off out of nowhere in the wake of moving up to Windows 11. Peruse the article till the end and let loose your PC’s plate space for better execution.
Why does Disk Space get taken in the wake of Upgrading to Windows 11?
The purpose for why this happens is essential; Windows needs to keep framework records for old Windows establishments. If you pursue any issues introducing an update, you can move back to Windows 10 with practically no problems. Nonetheless, if you have no problems, those documents occupy a room in your circle. Along these lines, it’s wiser to eliminate the records when moving up to Windows 11.
Be that as it may, recall after you have erased those records, you will not have the option to move back to the more seasoned form of Windows. Thus, erase those documents if you are confident that things are functioning admirably on your PC after overhauling. There are two techniques through which you can tidy up your circle stockpiling. Follow a few fundamental advances, and you will finish the cleanup.
How to Clean Up Storage utilizing Settings App?
That is the way to tidy up stockpiling by utilizing the settings application after you have moved up to Windows 11:
Stage 1. Open Settings on your PC or PC.
Stage 2. Presently look down and snap on the Storage choice. It will require an investment to show every one of the information.
Stage 3. After the stacking finished, snap on the get Temporary records choice.
Stage 4. Please search for a choice called Previous Windows Installs and click on the crate close to it. The document size ought to be around 10GB at any rate.
NOTE: Before going any further, recollect to uncheck the wide range of various boxes, or every one of your information will be eliminated for all time.
Stage 5. Presently click on the Remove Files choice at the first spot on the list. It will require an investment to finish the interaction; however, you will see there is presently some additional stockpiling accessible after it’s finished.
Also Read: Samsung Galaxy M53 Camera Performance
How to Clean Up Storage utilizing Disk Cleanup?
Stage 1. That is the way to tidy up stockpiling utilizing Disk Cleanup:
Open Start Menu and quest for Disk Cleanup application.
Stage 2. It will require an investment to stack up every one of the subtleties; after the stacking s contend, you will see every one of the kinds of records that can erase.
Stage 3. Presently click on the Clean Up System Files choice. You need to stand by at some point, and I will show you the framework records that can erase.
Stage 4. After the stacking finish, select the Previous Windows Installation(s).
NOTE: Make sure you have different uncontrolled choices before continuing any further.
Stage 5. Click on the OK to erase the records, and you are finished.
Stage 6. After the interaction finish, you will see there is no more extra room accessible.
Conclusion
On the off chance that you were searching for a method for erasing those pointless records, you are at the perfect location. We have shared two techniques to tidy up your circle stockpiling in a couple of fundamental advances. First, go through every referenced strategy to tidy up the taken space. In some cases, when you update your PC with the most recent variants, quite possibly, you could deal with specific issues.
The one arrangement is to track down the arrangement, or on the other hand, assuming nothing is settling the case, you can move back to the past adaptation. Nonetheless, it would help if you recollected that you could use depreciation to Windows 10 within ten days of your redesign. From that point forward, you will not have the option to move back.
That is All For Today. But, remain Tuned To Techfeets For More Stuff.


3 Comments